Okay so I've been promising to do this for ages. Ever wondered how we make things from one thing to another thing - well this is a classic Me&Yu re-work, step-by-step so you can have a go yourself!
From This....
To This
What You Need
A long full vintage skirt that fits you (eg above)
Sewing Machine
Thread (in suitable colour)
5mm Elastic (in suitable colour - black for darker colours, white for lighter ones)
Buttons or Trims
Sharp Embroidery Scissors
Large Fabric Scissors
Step One
Have a good look at your skirt, either on a mannequin or try it on.
Work out what 'bits' you'll have to work around.
This one has an elasticated waist and an annoying seam which you wouldn't want to fall in an awkward place. It's also pleated rather than gathered which can be tricky.
Step 2
Cut off the elastic with your sharp small scissors.
If you've a skirt with waistband and zip you'll have to cut off the waistband, unpick the zip and sew the gap closed.
Step 3
You'll need to 'finish' the raw edge.
I use an overlocker, which cuts and finishes in a nice neat edge but you can use zig-zag stitch.
*Notice that I've come nearer to that annoying seam - I'm going to use this as my hem so it won't interfere with the line of the dress.
Step 4
You need to mark where your elastic line will sit.
It needs to be lower than your underbust, but could also sit at your waist if you prefer.
Mine was 8" from the top edge. Mark all the way round with pins.
I decided to pin the pleats flat for a smoother line.
Step 5
Fold over and stitch your top hem from the wrong side.
You're making a little channel in which to sit your elastic so you need to make it over 1/2 cm in between the stitch line and the top.
Don't forget to leave a gap - you'll stitch this up later when the elastic is inside.
Step 6
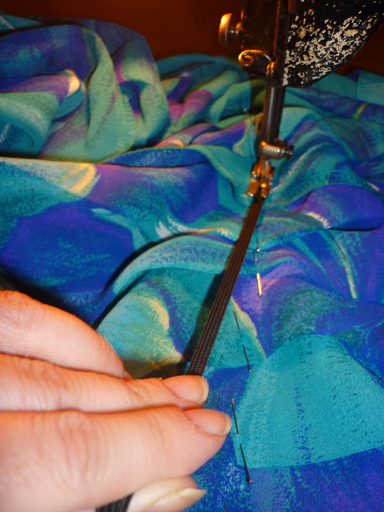
This is the tricky bit - you're going to add your elastic to the WRONG side of your skirt.
You can use straight or zig-zag stitching - whichever you prefer.
Starting at a side seam with a single layer of fabric under your machine, attatch the elastic firmly with a couple of backwards / forwards stitches.
Moving forward then you need to stitch the elastic down following the lines of the pins, taking the pins out as you go.
If that wasn't hard enough you need to stretch the elastic as you stitch - it's this that forms the gathers!!
***TIP- Just do a few inches at once!!***
Once you join your other elastic, overlap, backwards forwards stitch to finish and snip off the excess elastic
From the right side it should be nicely gathered - if not your elastic wasn't stretched enough ...
Unpick and tray again (that's the beauty of sewing!)
Inside view - the circle of elastic is clearly smaller than the skirt.
Step 7
Attatch a safely pin to the end of your elastic and thread all the way around your top channel.
When you reach full circle, thread the end back out of the hole and judge the right tightness.
It needs to sit at the top of your bust tightly without falling down but with enough stretch to get
on and off.
Knot off the ends together, pull tight and cut off the excess.
Step 8
Poke the ends back into the channel and manipulate the knot away from the gap so you can sew this up.
Step 9
If you have a label to sew on you'll need to sew it looped to allow for stretch!
Step 10
The last step is to finish with some detailling - I chose 3 vintage buttons but often I use lace or bows.
The finished article!!!
Wear with a skinny belt over the elastic line, cardie and brogues for a vintage princess look, heels and tanned for a summer night out!


No comments:
Post a Comment